The project view provides a representation of the various components of your
project hierarchy, as listed below.
It is displayed by default on the left side of the main window, and can
be selected by using the Project->Project View or
Tools->Views->Project menu items.
Under Windows, it is possible to drop files (coming e.g. from the Explorer) in the project view with the following behavior: a project file dropped will be loaded; any other file will be opened in a new source editor.
The project view, as well as the file and outline view provide an interactive search capability allowing you to quickly search in the information currently displayed. The default key to start an interactive search is <control-f>. This will open a small window at the bottom of the view where you can interactively type names. The first matching name in the tree will be selected while you type it. You can then also use the <up> and <down> keys to navigate through all the items matching the current text.
The various components that are displayed are:
They can be organized into a project hierarchy, where a root project can import other projects, with their own set of sources.
Initially, a default project is created, that includes all the sources in the current directory.
The Project View displays this project hierarchy: the top node
is the root project of your application (generally, this is where the
source file that contains the main subprogram will be located). Then a node
is displayed for each imported project, and recursively for their own imported
projects.
A given project might appear multiple times in the
Project View, if it is imported by several other projects.
There exists a second display for this project view, which lists all projects with no hierarchy: all projects appear only once in the view, at the top level. This display might be useful for deep project hierarchies, to make it easier to find projects in the project view.
This display is activated through the contextual menu entry
Show flat view, which acts as a switch between the two displays.
A special icon with a pen mark is displayed if the project
was modified, but not saved yet. You can choose to save it at any time
by right-clicking on it. GPS will remind you to save it before any
compilation, or save it automatically, if the corresponding preference
is saved.
Project View
You can chose whether you want to see the absolute path names for the
directories or paths relative to the location of the project. This is done
through the Show absolute paths contextual menu.
Special nodes are created for object and executables directories. No files are shown for these.
The contextual menu entry Show hidden directories can be used to filter
the directories considered as hidden. This can be used to not display the
version control directories like CVS or .svn for example.
A given file might appear multiple times in the Project View,
if the project it belongs to is imported by several other projects.
If you left click on a file and keep the button pressed, you can drop it
anywhere in GPS to open an editor at that location.
Double-clicking on a file, or simple clicking on any entity will open a source editor and display respectively the first line in this file or the line on which the entity is defined.
You can also drag a file anywhere into GPS. This will open a new editor if the file is not already edited, or move the existing editor otherwise. If you press <shift> at the same time, and the file is already edited, a new view of the existing editor is created instead.
If you open the search dialog through the Navigate->Find or Replace...
menu, you have the possibility to search for anything in the project view,
either a file or an entity. Note that searching for an entity can be slow
if you have lots of files, and/or big files.
A contextual menu, named Locate in Project View, is also provided when
inside a source editor. This will automatically search for the first entry for
this file in the project view. This contextual menu is also available in other
modules, e.g. when selecting a file in the Dependency Browser.
As described in the GNAT User's Guide, the project files can be configured through external variables (typically environment variables). This means that e.g. the exact list of source files, or the exact switches to use to compile the application can be changed when the value of these external variables is changed.
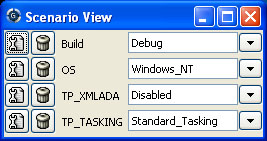
GPS provides a simple access to these variables, through a window
called the Scenario View. These variables are called
Configuration Variables, since they provide various scenarios for
the same set of project files.
A combo box is displayed in this area for each environment variable the project depends on. The current value of the variable can be set simply by selecting it from the pop-down window that appears when you click on the arrow on the right of the variable name
New variables can be added through the contextual menu
Project->Add Configuration Variable in the Project View.
The list of possible values for a variable can be changed by clicking on the
button on the left of the variable's name.
Whenever you change the value of one of the variables, the project is automatically recomputed, and the list of source files or directories is changed dynamically to reflect the new status of the project. Starting a new compilation at that point will use the new switches, and all the aspects of GPS are immediately affected according to the new setup.
Entities in the source code are presented with representative icons within the various GPS views (the Outline, Project, and Entity views, for example). These icons indicate both the language categories of the entities, such as packages and methods, as well as compile-time visibility. In addition, the icons distinguish entity declarations from other entities. The same icons are used for all programming languages supported by the viewers, with language-specific interpretations for both compile-time visibility and recognizing declarations.
There are five language categories used for all supported languages: package, subprogram, type, variable, and generic. The icons corresponding to these language categories are as follows.


These basic icons are enhanced with decorators, when appropriate, to indicate compile-time visibility constraints and to distinguish declarations from completions. For example, the icons for entity declarations have a small “S” decorator added, denoting a “spec”.
With respect to compile-time visibility, icons for “protected” and “private” entities appear within an enclosing box indicating a visibility constraint. For entities with “protected” visibility, this enclosing box is colored in gray. “Private” entities are enclosed within a red box. The icons for “public” entities have no such enclosing box. For example, a variable with “private” visibility would be represented by an icon consisting of a dot enclosed within a red box.
These additional decorators are combined when appropriate. For example, the icon corresponding to the “private” declaration of a “package” entity would be a square, as for any package entity, with a small “S” added, all enclosed within a red box.
Language constructs are mapped to the categories in a language-specific manner. For example, C++ namespaces and Ada packages correspond to the package category. C functions and Ada subprograms correspond to the method category, and so on. The generic category is a general category representing other language entities, but note that not all possible language constructs are mapped to categories and icons. (Note also that the generic category does not correspond to Ada generic units or C++ templates.)
The names of the categories should not be interpreted literally in terms of language constructs because the categories are rather general, in order to limit the number used. The variable category includes both constants and variables in Ada, for example. Limiting the number of categories maintains a balance between presentation complexity and the need to support distinct programming languages.
Icons for a given entity may appear more than once within a view. For example, an Ada private type will have both a partial view in the visible part of the enclosing package as well as a full view in the private part of the package. Two triangle icons will therefore appear for the two occurrences of the type name, one with the additional decorator indicating the “private” compile-time visibility.