Next: , Previous: The File Selector, Up: Editing Files


5.4 Menu Items

The main menus that give access to extended functionalities related to source editing are described in this section.

5.4.1 The File Menu

New
Open a new untitled source editor. No syntax highlighting is performed until the file is saved, since GPS needs to know the file name in order to choose the programming language associated with a file.

When you save a new file for the first time, GPS will ask you to enter the name of the file. In case you have started typing Ada code, GPS will try to guess based on the first main entity in the editor and on the current naming scheme, what should be the default name of this new file.

New View
Create a new view of the current editor. The new view shares the same contents: if you modify one of the source views, the other view is updated at the same time. This is particularly useful when you want to display two separate parts of the same file, for example a function spec and its body.

A new view can also be created by keeping the <shift> key pressed while drag-and-dropping the editor (see Moving Windows). This second method is preferred, since you can then specify directly where you want to put the new view. The default when using the menu is that the new view is put on top of the editor itself.

Open...
Open a file selection dialog where you can select a file to edit. Under Windows, this is the standard file selector. Under other platforms, this is a built-in file selector described in The File Selector.
Open From Project...
Open a dialog where you can easily and rapidly select a source file from your project.

open-from-project.jpg

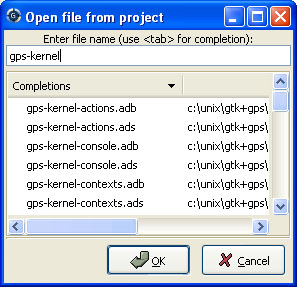
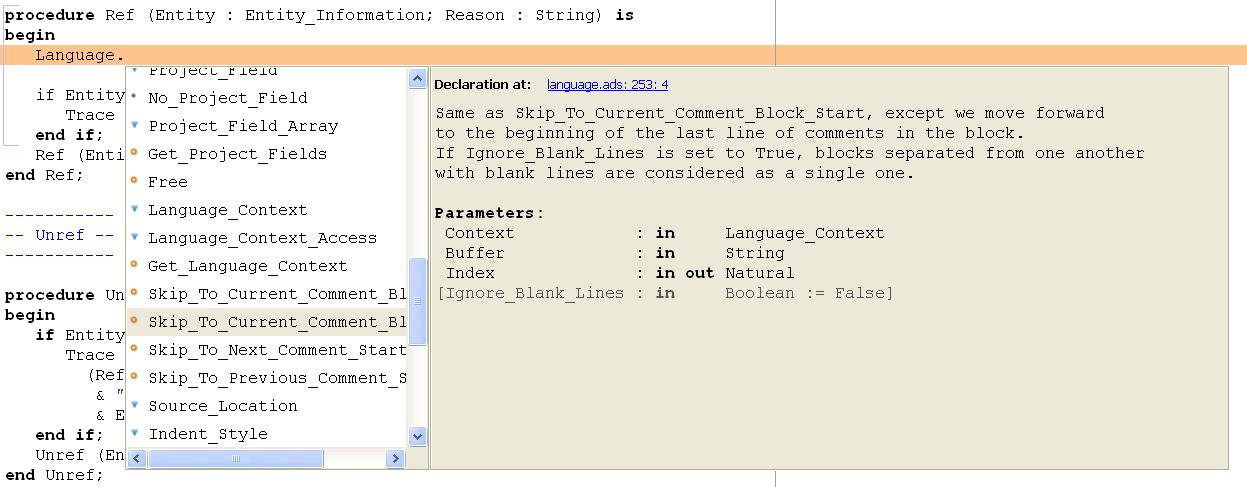
The first text area allows you to type a file name. You can start the beginning of a file name, and use the <Tab> key to complete the file name. If there are several possible completions, the common prefix will be displayed, and a list of all possible completions will be displayed in the second text area.

You can then either complete the name by typing it, or continue hitting the <Tab> key to cycle through the possible completions, or click on one of the completions in the list displayed.

If you press the down arrow key, the focus will move to the list of completions, so that you can select a file from this list without using the mouse.

Once you have made your choice, click on the OK button to validate. Clicking on Cancel or hitting the <Esc> key will cancel the operation and close the dialog.

This dialog will only show each file once. If you have extended projects in your hierarchy, some files may be redefined in some extending project. In this case, only the files from the extending project are shown, and you cannot have access through this dialog to the overridden files of the extended project. Of course, you can still use the project view or the standard File->Open menu to open these files.

Open From Host...
Open a file selector dialog where you can specify a remote host, as defined in The remote configuration dialog. You have access to a remote host file system, can specify a file which can be edited in GPS. When you hit the save button or menu, the file will be saved on the remote host.

See also Using GPS for Remote Development for a more efficient way to work locally on remote files.

Recent
Open a sub menu containing a list of the ten most recent files opened in GPS, so that you can reopen them easily.
Save
Save the current source editor if needed.
Save As...
Same current file under a different name, using the file selector dialog. See The File Selector.
Save More
Give access to extra save capabilities.
All
Save all items, including projects, etc...
Desktop
Save the desktop to a file. The desktop includes information about files, graphs, ... and their window size and position in GPS. The desktop is saved per top level project, so that if you reload the same project you get back to the same situation you were in when you left GPS. Instead, if you load a different project another desktop will be loaded (or the default desktop). Through the preference "Save Desktop On Exit", you can also automatically save this desktop when you quit GPS.

Change Directory...
Open a directory selection dialog that lets you change the current working directory.
Messages
This sub menu gives access to functionalities related to the Messages window. See The Messages Window.
Clear
Clear the contents of the Messages window.
Save As...
Save the contents of the Messages window to a file. A file selector is displayed to choose the name and location of the file.
Load Contents...
Open a file selector to load the contents of a file in the Messages window. Source locations are identified and loaded in The Locations View.
Export Locations to Editor
List the contents of the Locations view in a standard text editor.

Close
Close the current window. This applies to all GPS windows, not only source editors.
Print
Print the current window contents, optionally saving it interactively if it has been modified. The Print Command specified in the preferences is used if it is defined. On Unix this command is required; on Windows it is optional.

On Windows, if no command is specified in the preferences the standard Windows print dialog box is displayed. This dialog box allows the user to specify the target printer, the properties of the printer, which pages to print (all, or a specific range of pages), the number of copies to print, and, when more than one copy is specified, whether the pages should be collated. Pressing the Cancel button on the dialog box returns to GPS without printing the window contents; otherwise the specified pages and copies are printed on the selected printer. Each page is printed with a header containing the name of the file (if the window has ever been saved). The page number is printed on the bottom of each page. See Print Command.

Exit
Exit GPS after confirmation and if needed, confirmation about saving modified windows and editors.

5.4.2 The Edit Menu

Undo
Undo previous insertion/deletion in the current editor.
Redo
Redo previous insertion/deletion in the current editor.
Cut
Cut the current selection and store it in the clipboard.
Copy
Copy the current selection to the clipboard.
Paste
Paste the contents of the clipboard to the current cursor position.
Paste Previous
GPS stores a list of all the text that was previously copied into the clipboard through the use of Copy or Cut.

By default, if you press Paste, the newest text will be copied at the current position. But if you select Paste Previous immediately after (one or more times) you can instead paste text that was copied previously in the clipboard.

For instance, if you copy through Edit->Copy the text "First", then copy the text "Second", you can then select Edit->Paste to insert "Second" at the current location. If you then select Edit->Paste Previous, "Second" will be replaced by "First".

Selecting this menu several times will replace the text previously pasted by the previous one in the list saved in the clipboard. When reaching the end of this list, GPS will started from the beginning, and insert again the last text copied into the clipboard.

The size of this list is controlled by the Clipboard Size preference.

For more information, See The Clipboard View.

Select All
Select the whole contents of the current source editor.
Rectangles...
See the section see Rectangles for more information on rectangles.
Insert File...
Open a file selection dialog and insert the contents of this file in the current source editor, at the current cursor location.
Insert Shell Output...
Open an input window at the bottom of the GPS window where you can specify any external command. The output of the command will be inserted at the current editor location in case of success. If text is selected, the text is passed to the external command and replaced by the command's output.
Format Selection
Indent and format the selection or the current line. See The Preferences Dialog, for preferences related to source formatting.
Smart Completion
Complete the identifier prefix under the cursor, and list the results in a pop-up list. Used with Ada sources this command can take advantage of an entity database as well as Ada parsers embedded in GPS which analyze the context, and offer completions from the entire project along with documentation extracted from comments surrounding declarations. To take full advantage of this feature, the smart completion preference must be enabled, which will imply the computation of the entity database at GPS startup.

The support for C and C++ is not as powerful as the support for Ada since it relies completely on the xref information files generated by the compiler, does not have into account the C/C++ context around the cursor, and does not extract documentation from comments around candidate declarations. To take advantage of this feature, in addition to enable the smart completion preference, the C/C++ application must be built with -fdump-xref.

In order to use this feature, open any Ada, C or C++ file, and begin to type an identifier. It has to be an identifier declared either in the current file (and accessible from the cursor location) or in one of the packages of the project loaded. Move the cursor right after the last character of the incomplete identifier and hit the completion key (which is <ctrl+space> by default). GPS will open a popup displaying all the known identifiers beginning with the prefix you typed. You can then browse among the various proposals by clicking on the <up> and <down> keys, or using the left scrollbar. For each entity, a documentation box is filled. If the location of the entity is known, it's displayed as an hyperlink, and you can jump directly to its declaration by clicking on it.

Typing new letters will reduce the range of proposal, as long as there remain solutions. Once you've selected the expected completion, you can validate by pressing <Enter>.

Typing control characters (ie, characters which cannot be used in identifiers) will also validate the current selection.

GPS is also able to complete automatically subprogram parameter or dotted notations. For example, if you type

          with Ada.

the smart completion window will appear automatically, listing all the child and nested packages of Ada. You can configure the time interval after which the completion window appears (see The Preferences Dialog).

You can also write the beginning of the package, e.g.:

          with Ada.Text

pressing the completion key will offer you Text_IO.

If you are in a code section, you will be able to complete the fields of a record, or the contents of a package, e.g.:

             type R is record
                Field1 : Integer;
                Field2 : Integer;
             end record;
          
             V : R;
          
          begin
          
             V.

Completing V. will propose Field1 and Field2.

The smart completion can also give you the possible parameters of a call you're currently making. For example, in the following code:

          
             procedure Proc (A, B, C : Integer);
          
          begin
          
             Proc (1,

If you hit the completion key after the comma, the smart completion engine will propose you to complete with the named parameters "B =>", "C =>" or directly to complete with all the remaining parameters, which in this case will be "B =>, C => )".

smart-completion.jpg

Limitations:

•This feature is currently only available for Ada, C and C++. Using
the smart completion on sources of other languages behaves as the identifier completion does. See Complete Identifier.
•Smart completion for C and C++ is based on the xref information generated
by the compiler. Therefore, GPS has no knowledge on recently edited files. Use Build->Recompute Xref Info or rebuild with -fdump-xref to update the completion database.
•Smart completion for C and C++ is only triggered at the beginning of an
expression (that is, it is not triggered on special characters such as '(', '->', or the C++ operator '::') and it may propose too much candidates since it does not have into account the C/C++ syntax context. Typing new letters will reduce the range of proposal, as long as there remain solutions.
•Smart completion of subprogram parameters, fields and dotted notation
are not available yet for C and C++.

More Completion
This submenu contains more ways to automatically complete code
•Expand Alias
Consider the current word as an alias and expand according to aliases defined in Defining text aliases.
•Complete Identifier
Complete the identifier prefix under the cursor. This command will cycle through all identifiers starting with the given prefix.
•Complete Block
Close the current statement (if, case, loop) or unit (procedure, function, package). This action works only on an Ada buffer.

Selection
•Comment Lines
Comment the current selection or line based on the current programming language syntax.
•Uncomment Lines
Remove the comment delimiters from the current selection or line.
•Refill
Refill text on the selection or current line according to the right margin as defined by the right margin preference (see The Preferences Dialog).
•Refill with fmt
Refill text on the selection or current line using the external utility fmt. If fmt is not found on your system, this menu will not be displayed.
•Sort
Sort the selected lines alphabetically. This is particularly useful when editing non source code, or for specific parts of the code, like with clauses in Ada.
•Sort Reverse
Sort the selected lines in reverse alphabetical order
•Pipe in external program...
Open an input window at the bottom of the GPS window where you can specify any external command, which will take the current selection as input. The output of the command will replace the contents of the selection on success.
•Serialize
Increment a set of numbers found on adjacent lines. The exact behavior depends on whether there is a current selection or not.

If there is no selection, then the set of lines considered is from the current line on and includes all adjacent lines that have at least one digit in the original columns. In the following example, '|' marks the place where the cursor is at the beginning:

                 AAA |10 AAA
                 CCC 34567 CCC
                 DDD DDD

then only the first two lines will be modified, and will become

                 AAA 10 AAA
                 CCC 11 CCC
                 DDD DDD

If there is a selection, all the lines in the selection are modified. For each line, the columns that had digits in the first line are modified, no matter what they actually contain. In the example above, if you select all three lines, the replacement becomes

                 AAA 10 AAA
                 CCC 11567 CCC
                 DDD 12D

ie only the fifth and sixth columns are modified since only those columns contained digits in the first line. This feature assumes that you are selecting a relevant set of lines. But it allows you to transform blank lines more easily. For instance, if you have

                 AAA 1
                 BBB
                 CCC

this is transformed into

                 AAA 1
                 BBB 2
                 CCC 3

•Untabify
Replace all tabs in the current selection (or in the whole buffer if there is no selection) by the appropriate number of spaces
•Move Right
•Move Left
Shift the currently selected lines (or the current line if there is no selection) one character to the right or to the left

Fold all blocks
Collapse all the blocks in the current file.
Unfold all blocks
Uncollapse all the blocks in the current file.
Create Bookmark
Creates a new Bookmark at cursor position. For more information, See Bookmarks.
Pretty Print
Pretty print the current source editor by calling the external tool gnatpp. It is possible to specify gnatpp switches in the switch editor. See The Switches Editor.
Generate Body
Generate Ada body stub for the current source editor by calling the external tool gnatstub.
Unit Testing
This sub menu gives access to dialogs that make it easy to generate AUnit stubs. AUnit is an Ada unit testing framework.
New Test Case...
Create a new test case. See AUnit documentation for more details.
New Test Suite...
Create a new test suite. See AUnit documentation for more details.
New Test Harness...
Create a new test harness. See AUnit documentation for more details.

Edit with external editor
See Using an External Editor.
Aliases
Display the Aliases editor. See Defining text aliases.
Key shortcuts
Give access to the key manager dialog, to associate commands with special keys. See The Key Manager Dialog.
Preferences
Give access to the preferences dialog. See The Preferences Dialog.